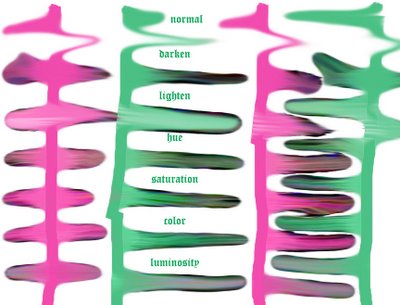
Smudge Painting Test Strip
 I was curious about the effects of the different options under smudge painting.
In this test strip, I have the smudge brush strength set at 41% and I tried each of the options as labeled to see how they would respond. The also intereact with colors near them. Even the lighten darkens the edges.
I did not add any colors to this other than the orginal starting colors of pink and green.
If you want to keep the original photocolors, use "normal". If you want to make it look more like a painting, choose the one of the others closest to the brush stroke you want.
Brush size and strength also affects this. I used a size 46 brush--the larger the brush, the more obvious and strong the affects.


2 Comments:
This is a good place to come back to to remind yourself of what does what! Very helpful Mary!
One thing it doesn't show is the fact that some of the options seem to effect the strength so that you have to use it more times to get the same length of stroke, for example.
But more such strips have to be made to show differences in strength and brush size, if you want to paint with it and really understand it.
Post a Comment
<< Home